Pages

Monday, May 30, 2011

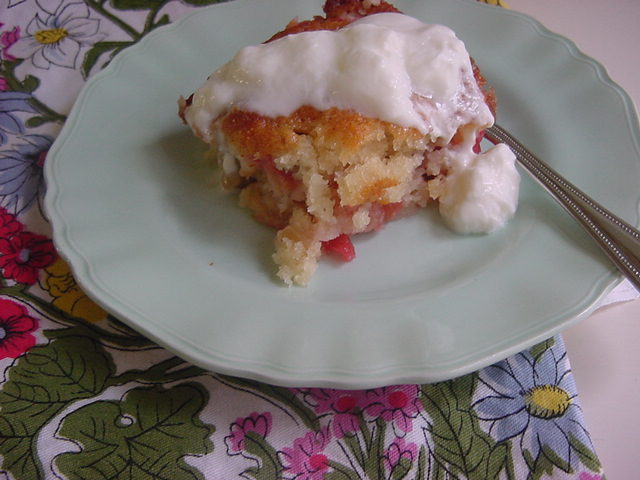
Honey Cake with Rhuby Soda

My sweet friend brought me a very special surprise.

A special surprise she knew I would love...and an armful of it.

Enough to make soda, a cake, and a crisp!

Thank you, my friend.

I love to bake with honey to cut back on the amount of sugar most recipes call for.

Honey is easily masked by the other flavours in baking but this cake is all about the honey and its warm, fragrant sweetness.

Nestled down inside the cake is some rhubarb...just because I can.

Honey Cake with Nestled Rhubarb
(adapted from Moosewood Farm Fresh Meals)

1/2 C softened butter
1/2 C honey
1/2 C sugar
2 eggs
1 1/2 C flour
1 Tbsp baking powder
1/4 tsp salt
1 1/2 tsp vanilla
1/2 C milk
2 1/2 C chopped rhubarb

Preheat oven to 350*. Butter a 7 x 11 baking dish.

Cream butter, honey and sugar together until light. Add eggs one at a time, beating well.
In a separate bowl mix together flour, baking powder and salt.
Combine milk and vanilla in a small bowl.
Alternate adding flour mixutre and milk to butter mixture, beating well after each addition.

Spread 2/3 of the batter over the bottom of the dish. Top with all of the rhubarb. Top gently with the rest of the batter, spreading to the edges.
Sprinkle with 1-2 tsp cinnamon sugar if you like.

Bake 35-40 mins or until golden and cooked through.

*Raspberries or strawberries would be a good substitute for the rhubarb.

Top with vanilla yogurt, whipped cream or ice cream.


Rhuby Soda
(culinate.com)

1 1/2 C chopped rhubarb
1 C sugar
1 1/2 C water
Sparkling water
ice

In a large saucepan, combine rhubarb, sugar and water. Boil and then turn down to a simmer for 15-20 mins or until the syrup is bright pink.

Turn off the heat, cool and pour into a large mason jar.

To make each soda, measure ¼ cup rhubarb syrup into a glass.
Add enough sparkling water to fill the glass ⅔ full. Stir to mix, then add ice.

Or make Soulemama's Ruby Junes.
Tuesday, May 24, 2011

Fleur de Sel Buttermilk Cake


Apricots are in season.

I love apricot season.

I can hardly keep apricots around long enough to make anything with them. The kids love and devour them.

So I hid some and made a cake with them.

The apricots really get to show off here as they lay on top of this mildly sweet, slightly salty, buttermilk cake.

If that's where it ended, that would be delicious enough, but its finished off with a sprinkle of fleur de sel.

Fleur de sel is really cool because it doesn't dissolve into the cake like other salts would. It sits on top adding really pretty texture and a light crunch.

This cake sparkles.

Salted sweets hooked me a few years ago when I tried a Salted Caramel Tarte at Nadege Patisserie. My love continued at Hotel Gelato, with their Salted Caramel Gelato...oh my!

Clara and I outside Nadege.

Fleur de Sel Buttermilk Cake
(adapted from 101cookbooks.com)

2 1/2 C Whole Wheat pastry flour (or a combonation of WWPF and Spelt)
1Tbsp baking powder
1/2 C brown sugar
1/2 tsp salt
2 eggs
1 C buttermilk
1/4 C butter, melted and cooled slightly
zest of 2 lemons
1-1 1/2 C Sliced Apricots (feel free to use any berry or soft fruit here. (I like using raspberries and blueberries here too)
1-3 Tbsp Large grain raw sugar (or scant 1 Tbsp of white sugar)
1 tsp fleur de sel or other large grain salt

Preheat oven to 400 degrees, rack in the middle.

Grease a 9 x13 dish or grease and line an 11inch tart pan.

Combine flour, baking powder, sugar and salt in a large bowl. In a separate bowl whisk eggs and buttermilk together, whisk in butter and zest.

Pour buttermilk mixture over flour mixture and combine gently. Try not to overmix here.

Spoon batter into dish, pushing into the corners. Top with fruit of choice.
Sprinkle with sugar and salt.
Bake 18-20mins. Or until cake is set and golden on top.


Monday, May 23, 2011

Some Solitary Cooking and a Rhubarb Pie


Three weeks of wonderful traveling and visiting made me thoroughly enjoy my slow Monday morning of quiet pie making.

Jibs is napping, Clara and Jimmy are out exploring the river for wildflowers and bugs, and I'm in the kitchen. Everyone is having a happy day indeed.

When I returned to my lovely little rhubarb crop this weekend I was pleased to discover a healthy bunch ready for picking.


Strawberry-rhubarb has to be one of my favourite fruit combos.


It literally took me an hour to decide what to do with my 8 precious cups of the sweet red gems.

Since its a holiday and my fridge is bare from our weeks of being away, my choices were somewhat limited.

I was missing key ingredients necessary for:


These looked inviting as well...tartlets and crisp.


In the end I settled on a simple Strawberry-Rhubarb Pie with Crumble from my good old Better Homes and Gardens Cookbook.


Strawberry Rhubarb Pie with Crumble
(adapted from Better Homes and Gardens Cookbook)

1 recipe Crumb Topping (below)
3/4 C sugar
1/3 C flour
1/2 tsp cinnamon
3 Cups fresh chopped rhubarb
3 Cups fresh quartered strawberries

Prepare and roll out pastry. Line a 9-inch pie plate with pastry and trim to fit the plate. Crimp edges if desired. Prepare crumb topping. Set aside.

In a large bowl, mix together sugar flour and cinnamon, add fruit and gently toss.

Transfer fruit to pastry lined pie plate.

Sprinkle with crumb topping.

Bake in a 375* oven for 45 mins.

Cool and eat with ice cream.

Crumble Topping

1/3C Brown Sugar
1/2 C flour
3 Tbsp cold butter
healthy pinch fresh nutmeg (optional)

Stir together sugar, nutmeg and flour, cut in cold butter until mixture resembles a crumb.


Thursday, May 5, 2011

The Boys

Jack: Hey Jimmy, are you going to share those snacks with me? If not, you'll get a piece of this!

Jim: Jack, that is not really funny you know!


Jack: Well, then share with me already!


Jim: NO! See my shoulder? Eat it!


Jack: Scores!!
Jim: Oooohhh! You're gonna get it now.

Commentary credit to Shannon.

Wednesday, May 4, 2011

French Sandwich Rolls


"...just two people that like warm rolls."

Ok, four people that love warm rolls.

There have been a few kitchen moments that have made me jump up and down with excitement.

These buns made me really excited!

Why I'm excited about these warm rolls:

1. They smell and taste like those perfect little french rolls you can buy in a fancy bakery.

2. They're easy.

3. They are going to be perfect for the BLTs we are having for dinner.

4. Most importantly, they look like a baby's bum while they bake! (Clara and I sat the whole 12 minutes in front of the oven door giggling...)

This recipe comes from Mel. She has great tutorials on working with yeast and how to roll these perfectly.

These would be a perfect burger bun.

Warm Rolls, "...I think this is the beginning of a beautiful friendship."

French Bread Rolls
(from melskitchencafe.com)

Makes about one dozen rolls (see Mel's tutorial on shaping these rolls)

1 1/2 cups warm water
3/4 tablespoon instant yeast (or 1 tablespoon active dry yeast)
2 tablespoons granulated sugar
2 tablespoons canola oil
1 teaspoon salt
4 cups all-purpose flour, give or take a few tablespoons

In the bowl of a stand mixer or in a large bowl by hand, combine the warm water, yeast, sugar, oil, salt
and 2 cups of the flour (if you are using active dry yeast instead of instant yeast, let the yeast proof in the
warm water and sugar for about 3-5 minutes until it is foamy and bubbly before adding the oil, salt and flour).

Begin mixing and continue to add the rest of the flour gradually until the dough has pulled away
from the sides of the bowl. Judge the dough not by the amount of flour called for in the recipe but in how the dough feels.
The dough should be soft and smooth but still slightly tacky to the touch.
Knead the dough in the stand mixer or by hand until it is very smooth and elastic,
about 5 minutes in a stand mixer or 8-10 minutes by hand.

Lightly spray a large bowl with cooking spray and place the dough in the bowl.
Cover the bowl with lightly greased plastic wrap.
Let the dough rise until it has doubled (this usually takes about an hour).

Lightly punch down the dough and turn it out onto a lightly greased countertop.
Divide the dough into 12 equal pieces and form the dough into round balls.

Place the rolls on a lightly greased or silpat-lined baking sheet about an inch or two apart.

Cover the rolls with lightly greased plastic wrap taking care not to pin the plastic wrap
under the baking sheet or else the rolls will flatten while rising.
Let the plastic wrap gently hang over the sides of the pan to fully cover the rolls but not press them down.
Let the rolls rise until doubled, about 45 minutes.

Preheat the oven to 400 degrees. Bake for 12-14 minutes until lightly browned and cooked through.